Thursday, March 15, 2012

Chicken and Dumplings

Ok. Being born and raised in the South, if you don't know a good recipe for Chicken and Dumplins, then you just might as well move up North and call yourself a Yankee. heehee!! :)
BUT! Lucky for you; even a Yankee can enjoy this amazing comfort dish. I have born my own recipe...and it's so simple, you'll wonder why you've never done this before. If you have time... and the resources... please try this simple dish. And, if you do.. leave me some feedback. I wanna know what you think.

What you'll need:
one pk of chicken thighs (about 6 thighs should work)
Mary B's Open Kettle Dumplings (I said easy!!)
Can of Cream of Celery soup
Can of Cream of Chicken soup
Box of Chicken Broth 


^^This stuff. Plus chicken^^

What to do:
 In a large boiling pot, add the chicken stock and enough water to equal about 2.5 quarts of liquid. Add your chicken, some salt and pepper and a little garlic powder if you want. Boil for about 20 minutes or until chicken is done.


Remove chicken from pot and allow it to cool. Into the SAME POT OF BROTH, add both cans of soup. Stir it all together really good. Now, it's DUMPLIN' TIME! :)

You're gonna want to crack those frozen dumplings into thirds. You don't want to fight a 6 inch dumpling. So, crack each frozen dumpling into thirds and add them to the broth. As you add, make sure you stir so they don't stick. Once you've added all the dumplings, turn your heat up until it starts to boil. 

Stir it really good, put a lid on it, turn it down to low and let it simmer for 30-40 minutes. Make sure you come back and stir it regularly so the dumplings don't stick. 

After about 30 minutes, pull the chicken into pieces and add it to the dumplings. Stir it up, take the lid off and let it cook another 10-15 minutes.

Serve and watch them smile! :)

Pizza Casserole

Easy schmeezey recipe right here. And, it's a pretty tasty dish. Found a recipe on the internet that gave me the idea, but of course I put my own spin on it. So, here it is!

What you'll need:
either 2 regular jars of your favorite spaghetti sauce OR one HUGE jar. 
Shredded mozzarella cheese
Pepperoni's 
1.5 lb of ground beef
1 pkg of rigatoni noodles or ziti noodles or whatever. 
9x13 casserole dish


Brown your ground beef and boil the noodles until done. Then, layer ingredients into the casserole dish like this:

Sauce
beef
noodles
cheese
beef
noodles
sauce
cheese
pepperoni


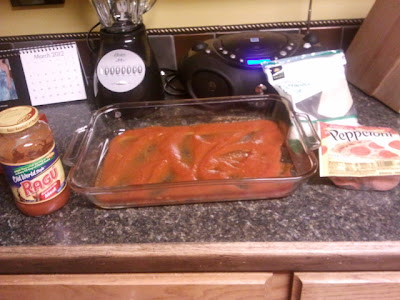
^^It should look something similar to this^^

Cover it with foil and bake at 350 for 30 minutes. Then, take the foil off and bake another 15 minutes. This should be your finished product:


Yummy!! Easy and tasty! Feeds the whole family! Enjoy!
 

Monday, March 12, 2012

I made an Apple Pie!

Holy Moly! I have never baked pies. Never tried it. This weekend, I decided to try my hand at a home made Apple Pie for my honey.

AMAZING!! I am going to share this recipe with you..and you've GOTTA try it. I found the basis for the recipe on a site, then I tweaked it and added to it until it became MINE! ALL MINE! So... here ya go..

Apple Pie worthy of competition!

2 9" pie shells
8 Granny Smith Apples (peeled, cored and sliced)
1/2 cup of unsweetened butter
3 tbsp all purpose flour
3/4 cup packed brown sugar
3/4 cup white sugar
1 tsp cinnamon
dash of nutmeg
1/4 cup of water (minus 1 tblspoon)
1 tbsp vanilla extract (to replace the tbsp of water you removed)

Preheat your oven to 425.

Ok.. here we go. Stay with me here. Get your 9" pie plate. Unroll one pie shell and dust both sides with flour. Place it into your pan and make sure it's nice and pretty.
Melt butter in a medium sized sauce pan, then mix in flour until it gets good and incorporated. Once it starts looking pasty, add brown sugar, white sugar, water, cinnamon, vanilla and nutmeg. Stir this really well and bring it to a boil. Once it bubbles a minute or two, turn it down to simmer.

DO NOT skimp on the 8 apples! You want to get them all sliced and piled into the pie shell. Just mound them up! Go ahead and pour the sugar mixture on top of the apples. Reserve about a 1/4 cup for the top!

Now, you gotta do this quick. Actually, you should already have your top crust ready to go, because that sauce caramelizes FAST! I use a basket weave design on top of my pie. I think it's pretty!... But, feel free to cut a design or just whatever you wanna do.
For the sake of me.. we're using the basket weave pattern! Seal your pie crusts. Then, you can brush the top crust with the remaining sauce to make it nice a brown and sweet and crusty.

Bake at 425 for 15 minutes!

Then, drop your temp to 350 and bake for 45 more minutes. Make sure your apples are soft.

A couple pointers?... You may want to place a cookie sheet on the lowest rack to catch drippings... and.. bake your pie on the middle, to low rack. Helps it to not burn the crust before it's done.

I know how tempted you will be to cut this puppy as soon as it comes out of the oven.. but resist the urge. Let the pie cool for about 90 minutes before you cut it. That allows the sauce to gel up and to make this one AMAZING pie!!!!

Please try this pie. And, when you do; take a picture of it and post it here for me! :) I wanna see!

Saturday, February 25, 2012

Cookie Day

So, today we (my bestie and my baby girl) made cookies. We had a great time. I just want to say that I have finally found the BEST royal icing recipe EVER! I'll give you the recipe, and insert a few cute pictures for the heck of it.

Royal Icing
1 cup of Confectioner's Sugar
1 teaspoon of milk
1/4 teaspoon of almond extract
1 teaspoon of kayro syurp

Add your food coloring after this and then mix it well. You may have to add some milk to get it to the consistency that you like (I always do)... but this recipe is fantastic! The almond extract makes the taste unbelievable, and the kayro syrup makes the icing shiny. Have fun!


 playing with the dough. 

 cookies after we iced them with the Royal icing. Ready to decorate!

So much fun! 

Finished products! 

 mmm... taste tested, kid approved!

Tuesday, February 7, 2012

Broccoli Cheese Soup

Ok, this one you will find me personally and thank me for. It is so rich and creamy... mmmm....

Ingredients:
1 medium onion thinly sliced
1 stick of butter
1 quart of Half n Half
1 family sized can Cream of Mushroom Soup
1 lb Vleveeta Cheese (cut into small cubes)
2 pounds of  broccoli (steamed)
Salt n Pepper

Saute the onion in the stick of butter until they are cooked and almost clear. Add half n half, soup, cheese, broccoli, salt and pepper. Cook on Medium heat for 20-30 mins, stirring frequently so the cheese melts completely.. Careful not to cook it too fast, or it will burn.

Serve and enjoy.

Try it and let me know what you think!

Friday, January 27, 2012

Cake Ballin'

Alright.. This is my first adventure through the lovely world of Cake Balls. These little gems are amazing!! So, without any further delay....I introduce to you: 
CAKE BALLS! 


First, choose your poison. Whatever cake mix and icing you choose. For this recipe, I used a white cake mix with Whipped Vanilla frosting. 

Step 1: Bake your cake and let it cool for about 20 minutes. 


Step 2: Crumble that sucker up into a fine mess! 


Step 3: Add about 3/4 of your chosen icing into the cake and mix it up really good. The best way to do this is with your hands. Yes! Get alllll gooey. It should have the consistency of play-dough when you're done.

Then, stick it in the freezer for a minimum of 30 mins or so. 


Step 4: Melt some candy pieces. Whatever color/flavor you want. Here, I used pure white/vanilla flavor. I also used some pink colored. 


Step 5: Take a tablespoon and dip out a nice amount of cake, then roll it into a ball and place it on a wax lined plate or pan. 

Dip your lollipop stick into the melted candy and then poke it into the cake balls (about halfway through). 


Put them in the freezer for a couple of hours, or overnight if you need to. 

When you're ready, just dip the cake balls into some melted candy and let the excess drip off. Then, quickly add your choice of sprinkles...and taaa-daaa! Cake Balls!


Just a few tips: 

*Be careful with the sticks, you don't want to be too rough with them, they may come out of the cake ball if you aren't careful. 

*You are going to have to act quickly to add the sprinkles/decorations once you coat them. Since they've been in the freezer, the candy coating is going to dry fairly quickly.

*While you're rolling the balls out, if the mixture becomes too sticky, put it back into the freezer for a few minutes. 

and, have FUN! 
This is a great time to get your kids in the kitchen. 
You can't go wrong here. 

Enjoy! :)


Thursday, January 26, 2012

White Chocolate Cran-Blueberry Cookies

Well. Let me just tell you. I can come up with the craziest combinations..but this one is so rich, you'll be livin' like a Rockstar!


This batter recipe is amazing! You could add whatever you want into the batter..I just wanted something a little different. Plus, my child thought she would like these Craisins (Blueberry flavored) when she saw them in the store. hahahahaa.. yeah. 


She hasn't touched them! So, here we are.. let's get this going. 

Ingredients:
1 cup of softened butter
1 cup of white sugar
1 cup of packed brown sugar
2 Eggs
2 teaspoons of Vanilla extract
1 teaspoon of baking soda
2 teaspoons of hot water
1/2 teaspoon of salt
3 cups of all-purpose flour
2 cups white chocolate chips
1 cup Blueberry flavored Craisins

Directions:
Soften butter and cream with white sugar and brown sugar until smooth. Add eggs, one at a time then Vanilla extract. Now, take the hot water and baking soda..and dissolve the soda in the water. Add that mixture into the batter along with the salt. Mix it all up really good. Add the flour and mix. Stir in white chocolate chips and Craisins (or whatever you want to substitute here..I highly suggest you try this recipe first..you won't believe the flavors).

Drop by spoon fulls onto a cookie sheet and bake 10 minutes on 350. 


Of course, once the batter is made, you have to have some of this:


and a little of this:


and don't forget a whole lot of this:


Enjoy! :) 

I almost forgot the secret ingredient: lots of laughs and love! 


Wednesday, January 25, 2012

Banana Muffins

Ok. I did this on a whim. It was soooo worth it! Just make sure you have milk available! You're gonna want to eat these warm and with a big glass of cold milk!

Ingredients:
2-3 Ripe Bananas
1/3 Cup of Melted Butter
1 cup Sugar
1 Egg (beaten)
1 tsp Vanilla Flavoring
1 tsp Baking Soda
Pinch of Salt
1 1/2 Cups of All-Purpose Flour

No mixer is needed. Get out your favorite wooden spoon and preheat your oven to 350.

Mush up bananas and melted butter


Add vanilla, egg and sugar. Mix again. 
Once that's mixed, add baking soda and a pinch of salt. 
Once alllll of that is mixed, add your flour. 

At this point, you could add half a cup of your favorite chopped nuts. 
I just like mine without them (and, I didn't have any in the pantry). 


Butter a muffin pan (or spray with Baker's Joy) and fill cups half way


Bake at 350 for 30 minutes..and waaaaa laaaaaa!


Ok, so they aren't pretty.. but DANG THEY'RE GOOD! 


Insert drool here. 

Wednesday, January 11, 2012

Garlic Lemon Chicken Kabobs

 *I made these the other night.. and they were awesome!! I did buy a can of pineapple chunks and I alternated chicken and pineapple. AMAZING! 


Ingredients:
3 tbsp. extra-virgin olive oil
Zest of 1 lemon
3 cloves garlic, minced or pressed
1 tbsp. minced fresh parsley
1 tsp. kosher salt
½ tsp. ground black pepper
1 lb. boneless, skinless chicken breasts, cut into ¾-inch pieces

Directions:
In a medium bowl, whisk together the olive oil, lemon zest, garlic, parsley, salt and pepper. Add the chicken pieces to the bowl and mix to coat with the marinade. Cover and refrigerate for at least 2 hours and up to 8 hours.

Prepare a medium fire in a grill. If using wooden skewers, soak them in water for at least 20 minutes before use.

Thread the chicken pieces onto skewers and discard the excess marinade. Lightly oil the grill grates. Place the kabobs on the grill, cover, and cook until the chicken is opaque throughout, about 8-12 minutes, turning once or twice during cooking. Transfer to a warmed platter and serve immediately.

Thursday, January 5, 2012

Taco Soup

Ok. I know everyone has their own Taco Soup recipe, and I have tried several! But this one takes the gold medal for me. I made it for my Halloween party this past year and I should have made a double batch of it. People LOVED it!


Ingredients
2 pounds ground beef
1 package taco seasoning mix
1 1/2 cups water
1 can mild chili beans
1 can whole kernel corn, drained
1 can pinto beans, rinsed and drained
1 can stewed tomatoes
1 (10oz) can diced tomatoes with green chile peppers (Rotel)
1 (4oz) can chopped green chilies
1 package ranch salad dressing mix


Directions
In a large pot, cook beef over medium heat until no longer pink; drain. Add taco seasoning and mix well. Stir in remaining ingredients. Simmer, uncovered, for 15 minutes or until heated through, stirring occasionally.

You can serve tortilla chips on the side with shredded cheese and sour cream, maybe some black olives.. Or.. just eat it with crackers like we do! It's awesome!

Mexican Chicken

This one is the go-to dinner for me if I'm tired and don't really want to cook. It's quick, easy and fairly cheap to make. No picture this time, sorry.. just trust me!

Ingredients
1 pk of chicken boiled and shredded
1 can Cream of Mushroom
1 can Cream of Chicken
1 can Rotel
1 Pkg of Velveeta Shredded Cheese (there is no substitute for this recipe, just makes it better!)
Tortilla Chips

Directions:
Boil chicken and shred. Put both soups and rotel in a blender and mix it until it's all incorporated.
In a sprayed 9x13 baking dish, layer chips, chicken, sauce and cheese. Then, another layer of chips, chicken, sauce and cheese.

Bake 350 for 20-25 minutes. Just make sure the cheese is melted and it's bubbling. Can't go wrong! Try it!

Spinach and Chicken Alfredo Hot Pockets

Ok, So I made this up last night after looking around the internet. I am so proud of me!! They were amazing!

1 cup of chopped up spinach
1 cup shredded mozzarella
One pack of boneless chicken boiled and cut up (I used a pack of tenderloins)
1/4 cup Parmesan cheese
Salt and Pepper
1 tsp Garlic Powder
Half a bag of those Bacon pieces (I guess about half a cup)
1 Roll of Refrigerated Pizza Dough
1 jar of your favorite Alfredo sauce
Egg Wash (egg and a tsp of water mixed up)


Directions:
Mix all ingredients into a bowl. Cut your Pizza Dough into several sections. I got about 6 total after I rolled it out and cut it.
Spoon chicken mixture into the middle of a section of the dough and fold over filing until all edges are sealed. Place fold side down on a sprayed cookie sheet.
Brush the top with the egg wash.

Bake on 400 for about 15 minutes.. until the dough is done.

YUM-O! Really! And very easy!

Tuesday, January 3, 2012

Cream Cheese Jalapeno Rolls


 1 package Cream Cheese (8 Ounce Package) 
4 ounces, weight Canned, Diced Jalapenos 
1 Tablespoon Sugar 
8 ounces, weight Tube Refrigerated Crescent Rolls


Preheat oven 375 degrees F.

Cut your cube of cream cheese and throw about 3/4 of it into a bowl. Now take about half of your jalapenos from the can and throw in with your cream cheese. I like to add a little more than half, maybe 3/4 of the can, but I like a little kick so it’s up to you.

This is the type of jalapenos I can get at my local grocery store. They are diced up really fine and work perfectly. But if you prefer to use fresh jalapenos, then go for it.

To your bowl with your cream cheese and jalapenos, add your Tablespoon of sugar. Do NOT omit the sugar!

Take your fork and mash it all up really well. Be sure to incorporate all that sugar in really well.

Set your bowl of cream cheese jalapenos aside for now.

Open up your tube of crescent rolls and place on your cutting board.

Separate them into two rectangles. Now pinch together the perforations to create two nice rectangles.

Spread half of the cream cheese mixture onto one of the rectangles. Save the other half of the mixture for the other rectangle. (You will have TWO rectangles per tube of crescent rolls.)

Once you’ve spread your half portion of cream cheese on one of your rectangles, start with the LONG end of the roll, and get to rolling.

Once it’s all rolled up, you will need to cut your log into 16 pinwheels.


Note: This is where you could refrigerate these little guys if you wanted to make them ahead of time. Then just bake them right when the gang is getting antsy.

Place your 16 poppers, laying face up, on a cookie sheet that has been sprayed with Pam.

Make sure you face them up, with the cream cheese facing upward.

Pop these into the oven for about 13 minutes until they are golden brown. Keep an eye on them, as each oven varies.

Once they are done, immediately slide them off the cookie sheet, onto a plate.